
Welcome to POD Express
Manual? I don’t need no stinkin’ manual!
One of our goals was to design the Line 6® POD® Express family devices to be simple enough that you can just plug in and start riffing. But you might miss out on some cool tips, tricks, and shortcuts that help you make better sounding tones and speed up the entire process. You can start by viewing the POD Express Guitar Overview videos below, and don't forget to also take a look at the Cheat Sheet included in the box with your device.

Tip: Be sure to visit line6.com/meet-pod-express for the latest POD Express news, tips, and product information.
https://www.youtube.com/watch?v=cZZuUDrq5cQhttps://www.youtube.com/watch?v=RAv71drvVHw&t=2s
What’s the Difference?
POD Express devices contain models derived from the award-winning HX® family of processors.
POD Express Guitar contains a versatile collection of essential guitar amps, cabs, and effects to cover a wide range of tones and styles.
POD Express Bass is designed for bassists, with its own set of classic bass amps, cabs, and effects.
Functionality is much the same for each of the POD Express devices, but you’ll want to choose the one that best match your sonic needs—and there is certainly no rule that says you can’t get more than one!
What’s in the Box
Line 6® POD® Express Guitar, POD® Express Black, or POD® Express Bass multi-effects device
Three AA batteries
Adhesive rubber feet
Cheat Sheet, Safety & Compliance, and Warranty documentation
Minimum System Requirements
The minimum operating systems supported for POD Express Edit and Line 6 Central applications and USB audio functionality are as follows:
macOS 11, Big Sur - Apple computers with Intel® and Apple silicon processors are supported
Windows® 10
Apple iOS 15 and iPadOS 15
Android™ 6 for POD Express Edit, Android 8 for USB audio
Internet connection required for firmware updates via POD Express Edit or Line 6 Central (on macOS or Windows computers)
Note: General performance for USB audio can vary, depending on your system’s hardware specs and the complexity of your particular audio projects.
Updating POD Express
It is highly recommended to check for and install the latest firmware update, if one is available, which can be accomplished easily using the free POD Express Edit macOS or Windows application—see the next section.
POD Express Edit Application
POD Express Edit is not only an indispensable librarian for managing and backing up all your presets but also provides simple and expanded editing of all amps, cabs, and effects via your macOS or Windows computer or iOS, iPadOS, or Android mobile device. Simple POD Express device firmware updating is also provided using the applications integrated, online Updater utility. POD Express Edit works with all Line 6 POD Express devices (firmware version 2.00 or later and macOS or Windows POD Express Edit application required) and is available free at line6.com/software.
https://www.youtube.com/watch?v=08N787XTNxA
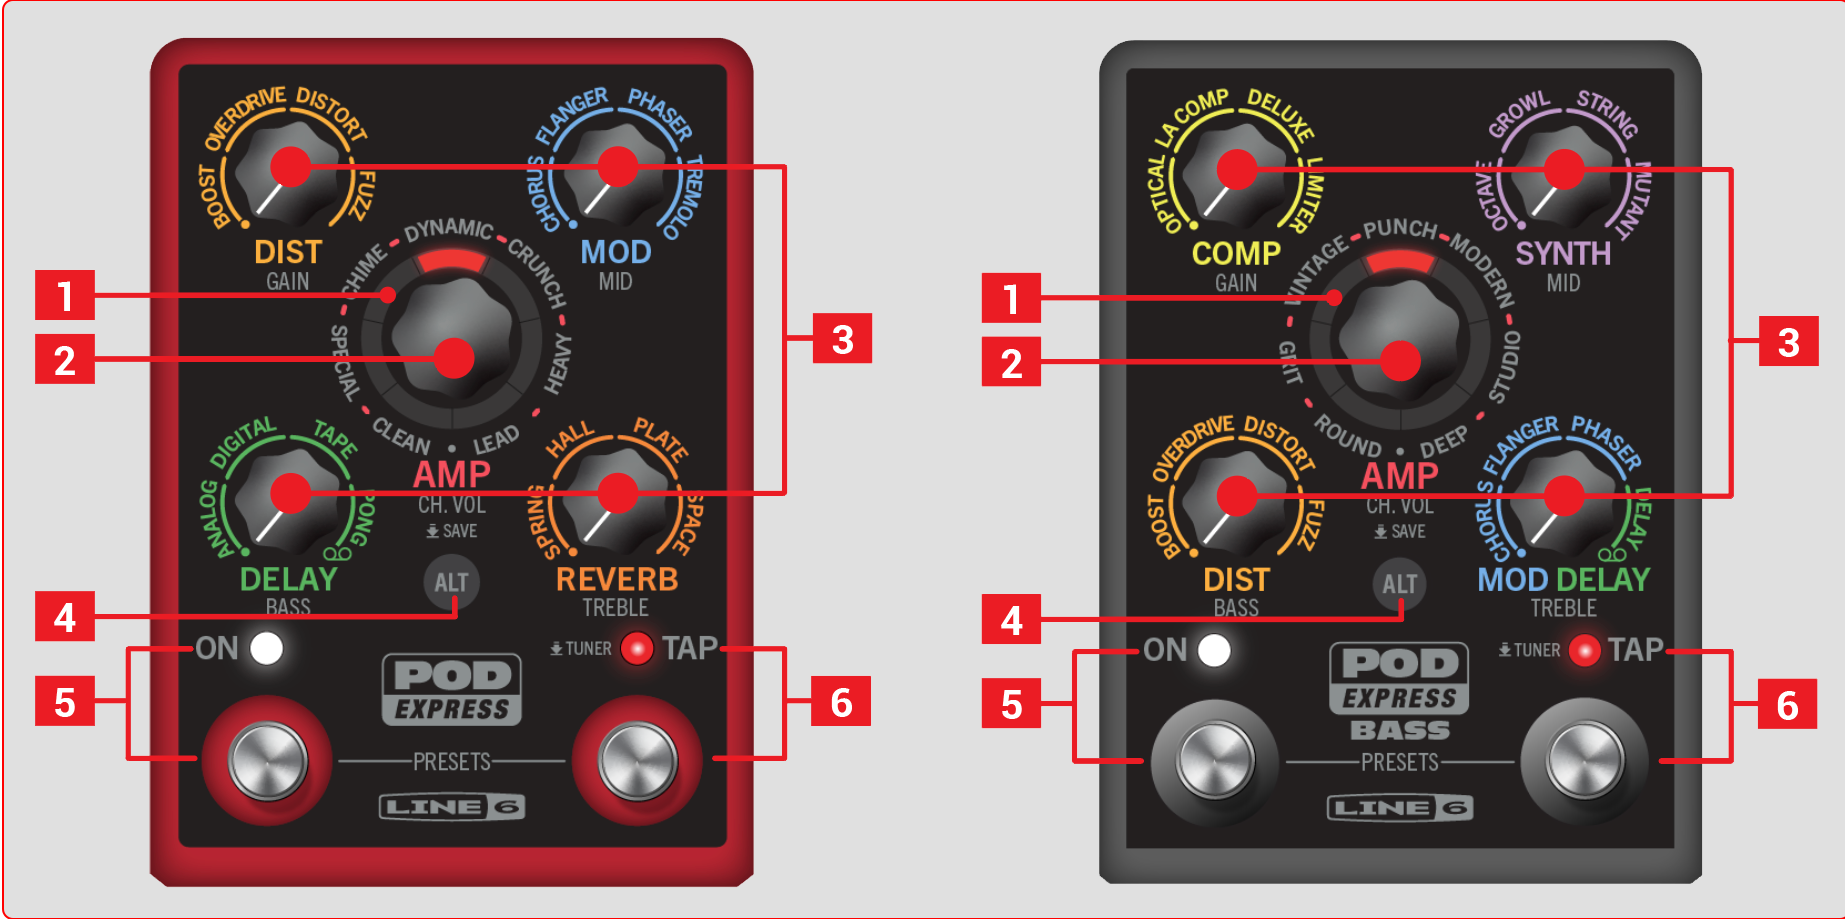
POD Express Guitar and POD Express Bass devices
Top Panel Controls
1. LED Ring: The seven, multi-color LED segments light to indicate various parameter functions, as covered throughout this Manual. While turning the AMP encoder, a red LED indicates the selected amp model. While holding the ALT button and turning the AMP encoder or Effects knobs, LED segments indicate the corresponding value—see Amp, Cab, and Effect Models .
While turning an Effects knob, the AMP encoder’s LED segments light in clockwise fashion 1-7 to indicate the intensity of the current effect model—see Selecting an Amp Model.
When in Global Settings mode, each LED indicates the setting and its selectable values.
Also, see the full list of Amp Models.
2. AMP Encoder Turn to select an amp model, or turn to the detent at the 6 o'clock position marked by for no amp. You’ll see LED segments 1-7 light to indicate the current model (or no LED lit when set to for no amp). A matching speaker cab model is also loaded.
Hold the ALT button and turn the AMP encoder or Effects knobs to adjust amp parameters, as indicated by the silver labels beneath each.
Hold the ALT button and TAP switch and turn the AMP encoder to select a different cab model, or turn to for no cab.
Press and hold the AMP encoder to Save the current preset.
To change the default Cab, see the Selecting a Cab Model section
3. Effects Knobs Turn to select the desired effect model within each of the four effect categories, or turn entirely counterclockwise to bypass the effect category. Also, see Effect Models.
Tip: Turn the DELAY knob (POD Express Guitar) or MOD DELAY knob (POD Express Bass) fully clockwise to select the Looper. Also see The Looper.
4. ALT Button Press to access alternate features with the knobs or switches.
Press and hold the ALT button and press and release the TAP switch to enter the Global Settings. While in the Global Settings, press ALT to access additional settings.
Hold ALT and turn the AMP encoder and Effects knobs to adjust their corresponding amp parameters.
Press and hold both the ALT button and the TAP switch while turning the AMP encoder to select a cab model or while turning a corresponding Effects knob to edit Noise Gate parameters.
Press and hold both the ALT button and TAP switch while turning a corresponding Effects knob to adjust the amp's Master Volume or Presence.
5. ON Footswitch (FS1) and LED Press to enable or bypass the device. The LED lights white when enabled.
6. TAP Footswitch (FS2) and LED Press the TAP switch two or more times to set the tempo BPM (beats per minute) for Modulation and Delay effects. The LED flashes red to indicate the current tempo—see Setting the TAP Tempo.
Press and hold the footswitch to display the Tuner.
Tip: The ON and TAP footswitches’ functions can optionally be changed to toggle all or individual effects categories on and off.
Preset Mode Switching
Press and hold both the ON and TAP switches to enter Preset Mode. You can then press-release the ON or TAP switches individually to scroll up/down through the device's 21 preset locations. You can edit and overwrite any of the presets as desired.
Rear Panel Jacks
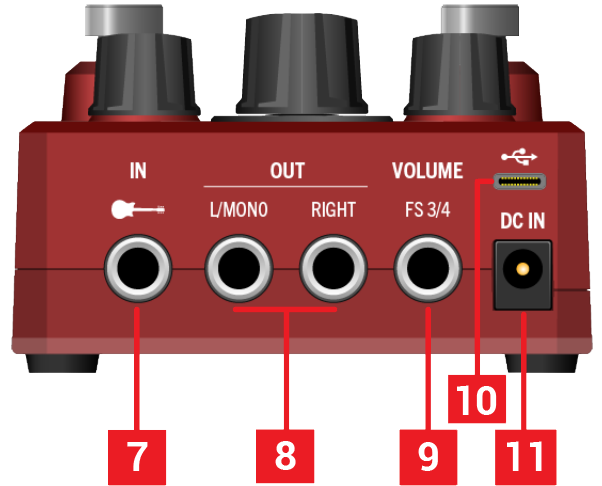
The POD Express rear panel jacks
(all devices offer these same connections)
7. IN Use an unbalanced 1/4" TS cable to connect your guitar, bass, or mono pedals to this input. If you’re using batteries, your device powers on when a cable is connected here and powers off when disconnected.
8. OUT L/MONO, RIGHT Use unbalanced 1/4" TS cables to connect to an external amplifier, mixing console, or into other pedals. When connecting to a mono amplifier or pedal, connect only the OUT - L/MONO jack.*

*Note: When only the OUT L/MONO jack is used, connecting headphones to the PHONES jack will change the OUT L/MONO signal to include only the left channel processed signal from stereo effects (MOD, DELAY, LOOPER, and REVERB type models). This may result in slight differences in the sound of these effect models. The PHONES signal remains unaffected.
9. VOLUME | FS 3/4 Connect an expression pedal to control Volume and/or a footswitch (or two footswitches) to control other features—”Setting up an Expression Pedal and Footswitches” on page 14.
10. USB Connect to your Mac or Windows computer's USB 2.0 (or faster) port or to a mobile device to use with the free “POD Express Edit” application, or to use your POD Express device as an audio interface.† (Note that USB hubs are not supported.)
†Note: For mobile devices that do not include a USB-C connector, a cable adapter is required, such as an Apple Camera Connect Kit for lightning-equipped iOS & iPadOS devices or a USB OTG adapter for Android devices. All adapters are sold separately. Please refer to your mobile device manufacturer’s recommendations and instructions for connecting USB accessories.
11. DC IN As an alternative to using batteries, connect a power adapter, such as the Line 6 DC-1g (sold separately). Power adapter requirements are 9VDC output voltage, center-negative (2.1mm center diameter), 500mA minimum current, and 4.5W minimum power.
POD Express Left Panel
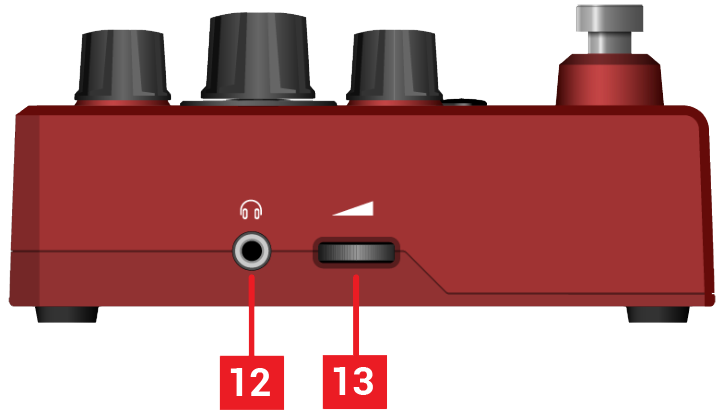
The POD Express left panel features
(all devices offer these same features)
12. PHONES Connect stereo headphones here; turn the VOLUME thumb-wheel to adjust volume.

IMPORTANT! Always turn the VOLUME knob to minimum before connecting headphones. Protect your hearing!
Tip: Disconnect PHONES when not in use to avoid draining batteries.
13. VOLUME Turn the thumbwheel to set the overall output level for the OUT & PHONES.