
Global Settings
The Global Settings contain additional parameters that apply to all presets, such as input and output levels, footswitch configurations, etc. To access the Global Settings, use the following steps. Most likely, you’ll only need to configure these Settings once to your liking and forget all about them! Note that the steps to edit Global Settings parameters are the same for POD Express devices. However, the footswitch parameters’ selectable options differ slightly, as noted.
Editing the Global Settings Options
1. Press and hold the ALT button and press the AMP encoder to enter Global Settings mode and display the first page of options.
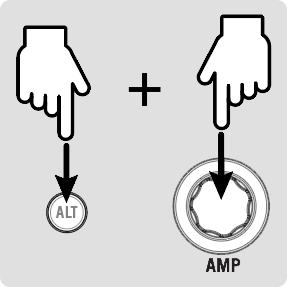
Accessing the Global Settings
2. Turn the Amp encoder to select Global Setting 1 - 7 from "page 1" of the Global Settings options.
The seven LEDs that surround the AMP encoder light up with colors reflecting the current values of Global Settings 1-7. Press and release the ALT button to change to page 2 of the Global settings and turn the Amp encoder to select setting 8 - 11.
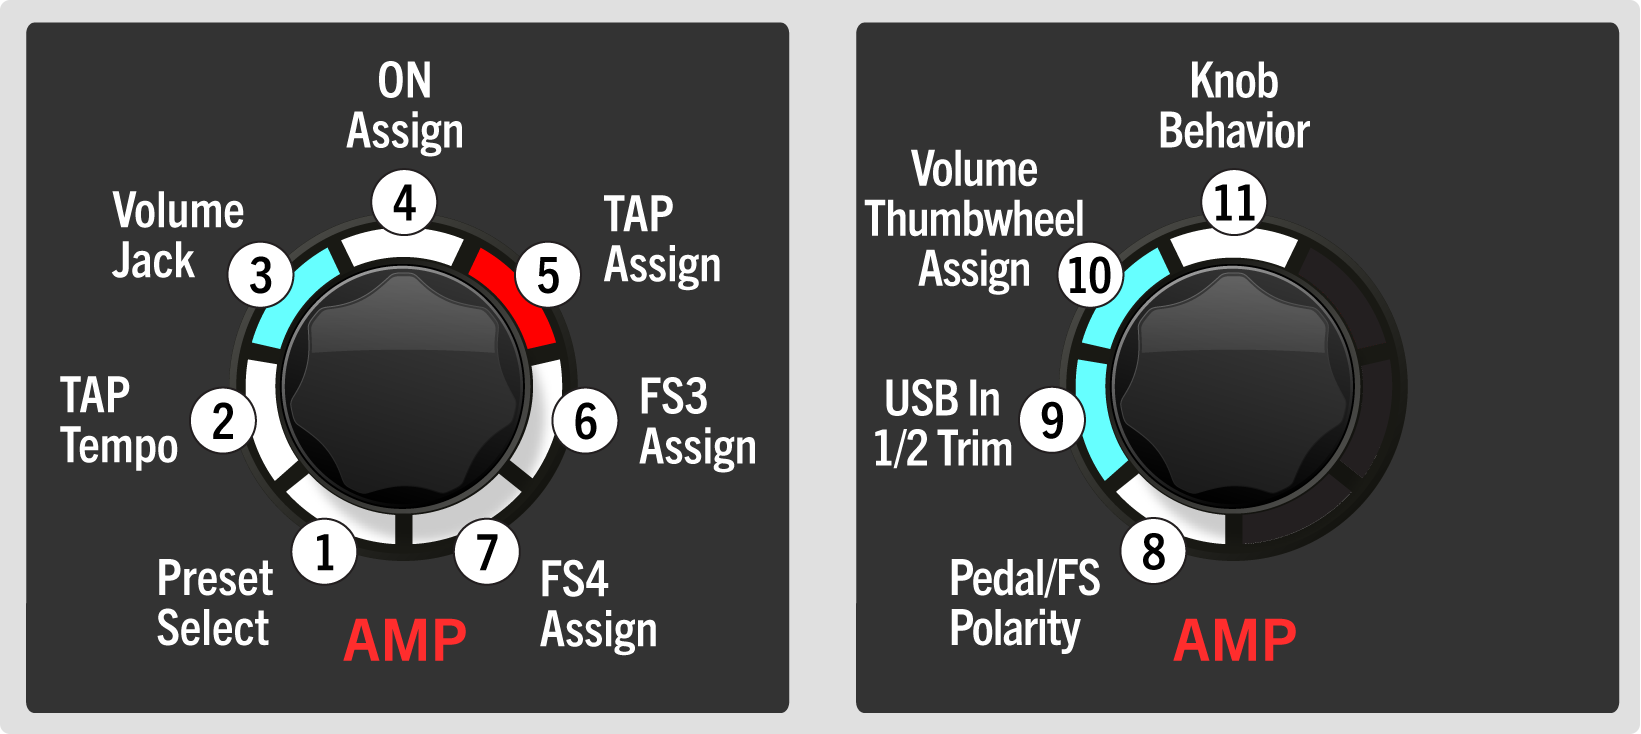
Page 1 and 2 of the Global Settings option
3. Push the Amp encoder knob to change the selected Global Setting's value—you'll see the respective LED change color to indicate the value.
Please reference the following Global Settings Table for the values and descriptions for each of the Global Settings options.
Global Settings Table
POSITION | PARAMETER | LED COLOR, VALUE, AND DESCRIPTION
|
1 | Preset Select | Configure the behavior for preset loading while in Preset Mode (see “Working with Presets” on page 16): (White) All Instant - When pressing TAP or ON, (or turning the AMP encoder) the next/previous preset is immediately loaded. (Aqua) Load On/Off - Pressing TAP or ON (or turning the AMP encoder) queues the selected preset, and then pressing both the TAP and ON switches loads the queued preset. |
2 | TAP Tempo | Choose whether the TAP Tempo is applied per preset or globally: (White) Per Preset - The TAP Tempo rate is applied and saved individually, per preset. (Aqua) Global - The TAP Tempo is applied globally. |
3 | Volume Jack | Configure the Volume jack to connect a single (or dual) footswitch or to connect an expression pedal (or an expression pedal and a footswitch). Use the FS3 Assign and FS4 Assign global settings to choose the function for each switch: (White) FS3/FS4 (switches) - Configure the jack for connecting a single or dual footswitch. (Aqua) Volume/FS4 (expression pedal/switch) - Configure the jack for connecting an expression pedal (and, optionally, an external footswitch. The expression pedal will control the Volume and switch will control FS4. |
4 | ON Assign | Configure the function of the POD Express Guitar ON footswitch behavior: (White) All On/Off - Enable or disable the device—when Off, this disables all processing. (Aqua) Effects On/Off - Enable or disable all effects (Noise Gate, Distortion, Modulation, Delay, Reverb, and Volume). (Light orange) Distortion On/Off - Enable or disable the Distortion effect. (Blue) Modulation On/Off - Enable or disable the Modulation effect. (Green) Delay On/Off - Enable or disable the Delay effect. (Dark Orange) Reverb On/Off - Enable or disable the Reverb effect. |
 IndicatesFactory Default Value
Restoring All Global Settings
You can optionally perform a Factory Reset on your POD Express device to return all Global Settings to their factory defaults.

IMPORTANT! Performing a Factory Reset will also restore all factory presets, erasing any custom presets you may have saved on your device. We highly recommend using the POD Express Edit app to create a backup of your device before performing a Factory Reset. Once the Factory Reset is completed, you can optionally use POD Express Edit to restore the backup to restore your previous presets and Global Settings. Please see The POD Express Edit Application.
Performing a Factory Reset
Start by powering POD Express off and disconnecting any USB cable. While holding both the ON and TAP footswitches, power on the device:
If using batteries, connect a 1/4" cable into the device's IN jack to power on.
If using a power adapter, connect the adapter to the DC IN to power on.
When powering on the device, you’ll see all the AMP encoder’s LEDs flash white briefly three times indicating the factory reset was successful.